
riored4v
-
Content Count
202 -
Joined
-
Last visited
Everything posted by riored4v
-
Currently running my 12" ICON in a 1.35 cu ft sealed enclosure. The car is a hatchback. While the sub itself sounds clean and puts out decent volume, I'm often wishing it hit the lower notes a bit better and was louder. Is anyone able to help me design a ported enclosure for this sub? I'm trying to keep the footprint of the enclosure as small as possible, but I understand it'll take more space than the sealed setup currently. This is the current setup: Untitled by riored4v, on Flickr Regarding the height, i can't really go much taller since this still allows me to use my hatch cover to keep everything out of eye sight. Its at 13.5" tall. Any help would be appreciated.
-
Took some quick measurements and if rebuilding a box, I think i'd like to go with 13" H. I could go with 17" D pretty comfortably (can go more if needed) and the W I'm a bit open to. I guess I would be curious on how wide it would actually end up being if it was 13"Hx17"D. I'd also prefer to keep the sub top firing like it is currently so I dont have to worry about stuff sliding in to it. Thanks again for the help guys.
-
Alright. I'll grab some front-to-back measurements of the hatch floor. I'm thinking if I can keep the box contained to just one side of the hatch, leaving the other side open and usable, that it would be perfect. I'm not too worried about factoring in the angle of the seats.
-
Yup, I did. The height of the box is too tall to fit the area I'm trying to work with.
-
Pulled the power from my previous car to re-use in my new car. Noticed a little bit of discoloration from where it was ran through the fender. Does this look ok to use? Untitled by riored4v, on Flickr
-

Is this power wire ok?
riored4v replied to riored4v's topic in Amplifiers / Head Units / Processors / Electrical
good idea. I think I'll go that route. Thanks! -
Is this power wire ok?
riored4v replied to riored4v's topic in Amplifiers / Head Units / Processors / Electrical
That was the initial plan, but turns out the wire is pretty much already the exact length i need for the new car. So its either run this one, or just pick up a new run. -
Is this power wire ok?
riored4v replied to riored4v's topic in Amplifiers / Head Units / Processors / Electrical
I checked around for any sort of cracking and the condition of it still seems to be great. Its not brittle or cracked at all. I'm not sure if it got discolored from moving around or what. -
the net volume of the sealed enclosure is likely too small to simply add an external port. how volume would need to be added for the port to work out? check out the box size requirements for a ported and sealed box for the icon. gotcha. Already did that. I wasn't sure if you had something else in mind since there's uses a rectangular port. I'll be sticking with the sealed box since i think the ported would take up about half of my hatch area.
-
Working on redoing my previous setup to adjust it for my new car. My previous car was a mustang and i had the setup in the trunk on about 1400w at 1ohm. Sub is a 12" ICON in a sealed enclosure. For the new car, its a hatchback so it should be louder anyways. The alternator/battery isn't as strong as the mustang's was and its not really something i'm looking to upgrade right now. On the mustang I was running a cap which helped with the dimming (yea yea.. i know about caps, but it worked out for that setup). On this car, i'd like to do away with the cap. The thought is to run the amp (audioque 1200d) at 4ohm instead of 1ohm. It would drop the power down to 510w (conservatively) instead of the 1400-ish at 1ohm. How much would that effect the output of the sub? I've seen posts about the sub still performing well at lower power, but i'm unsure if it would be a noticeable difference, especially since it would be moving in to a hatchback setup.
-
the net volume of the sealed enclosure is likely too small to simply add an external port. how volume would need to be added for the port to work out?
-
Thanks Aaron. I think I'll give it a shot. I'm not trying to compete with it or anything like that. Just want to make sure it sounds solid and is still very punchy for daily use.
-
alright. Thanks. Pretty much I was assuming but figured I would ask first. I dont think I have the room to port it or go with a larger enclosure. I'm just hoping reducing the power to the sub will work out with it being a hatch. Thanks again for the info/help.
-
How could I optimize the enclosure for a hatchback type car? I'm still wanting to stick with a sealed enclosure to keep the footprint small of it, but suggestions on how to set that up properly would be appreciated.
-
I built a sealed box for my 12" ICON to proper size for my mustang, but I've recently sold that car and picked up a small hatchback. I want to stick with the sealed enclosure design for this car to minimize the amount of space. Whats the smallest I could go enclosure-wise for the ICON? Would it be possible to go smaller than the .9-1.25cu ft size thats recommended if the difference way made up with polyfill? Ideally i want as small as box as possible but I still want the sub to sound great.
-
Thanks guys. I'm really pleased with how its turned out.
-
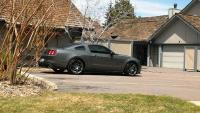
Figured I would get some pictures up of the stereo build up for my mustang. Nothing really over the top or crazy. Just wanting to improve on sound since its my DD. Quick pic of the car: IMG_0271 by riored4v, on Flickr Stereo so far: Stock HU AudioControl LC6i Audioque 1200d amp Knu wiring Infinity Kappa 6829CF speakers in the doors & rear deck 12" SSA ICON Originally had a 12" Image Dynamics IDQ setup that I was using previously. Worked well, but wanted more. Didn't initally want to go sealed, but the ported enclosure for the ICON was going to take too much space to work properly. The "skirt" underneath the box shows where the old ported enclosure came out. Wanted to use it over for this box since they were about the same size. IMG_0283 by riored4v, on Flickr Removed the carpet from the skirt, trimmed down the peices and attached them to the new box: IMG_0284 by riored4v, on Flickr Skirt attached. Old box next to the new one IMG_0286 by riored4v, on Flickr Wires ran and the mounting brackets in place for the box IMG_0287 by riored4v, on Flickr Carpeted IMG_0289 by riored4v, on Flickr IMG_0288 by riored4v, on Flickr IDQ next to the ICON IMG_0297 by riored4v, on Flickr IMG_0298 by riored4v, on Flickr Finished up and installed IMG_0299 by riored4v, on Flickr IMG_0300 by riored4v, on Flickr Next up is probably a bigger alternator and pulling out my Thermo-Tec sound deadener in favor of some stuff from SDS
-
Picked up the new ADS Maestro, ADS dash kit and Kenwood DNX890HD for the mustang. . Install was pretty straight forward. Accessing the wire for SYNC and OBDII was a bit of a pain though. Really loving how much you can customize the setup and how much better the audio quality is. CM5 kit was an mistake in the shipping, otherwise the other parts were all necessary. CM5 kit was actually supposed to be the RR Maestro unit. IMG_1016 by riored4v, on Flickr Maestro RR IMG_1027 by riored4v, on Flickr Stock IMG_1017 by riored4v, on Flickr SYNC module located behind glove box IMG_1020 by riored4v, on Flickr Sh1tty pic.. but the SYNC wire that needed to be tested. Should read 5v and then drop when the SYNC voice command button is pushed. IMG_1021 by riored4v, on Flickr Pulled the OBD2 harness out from the clip and had to splice in to these 2 wires IMG_1026 by riored4v, on Flickr For splicing the factory SiriusXM antenna, you have to remove this clip after taking the cable out of the factory head unit IMG_1024 by riored4v, on Flickr You can then put it in the aftermarket tuner. Its a slightly loose fit, so some epoxy was used on the outside portion. IMG_1023 by riored4v, on Flickr Tuner in place IMG_1025 by riored4v, on Flickr Mess of wires from the ADS harness IMG_1022 by riored4v, on Flickr Also had to run the GPS wire through the dash. Decided to mount mine in the middle of the dash in front of the light sensor IMG_1037 by riored4v, on Flickr Then you plug the RR module in to the computer, program it and flash it and it fires everything up. IMG_1031 by riored4v, on Flickr Unit come with a ton of different buttons so you can customize the layout of the dash kit. IMG_1034 by riored4v, on Flickr IMG_1043 by riored4v, on Flickr IMG_1039 by riored4v, on Flickr IMG_1038 by riored4v, on Flickr
-
Sorry for the delayed response. Nope, I didnt have to remove anything. It was a snug fit. The box was 25" wide, 11 3/4" deep and 12.5" tall. I don't recall the height of the skirt I built around the box though.. I would guess about 3" tall. I had to clearance the beam in the trunk to get the box back as far as I wanted it to be, so depending on if you did that or not, the height of the skirt would vary.
-
Pretty surprised about the amount of mustang people here haha. I'm on Corral but I rarely post there anymore. The 11+ forum doesnt seem to be as good as the 87-93 forums, so I primarily visit S197forum and SVTP.
-
Those old Fox Saleen's were pretty awesome. I used to have an 87 Saleen.
-
Naw, I was pretty much only interested in the GT.
-
Thanks man. I appreciate it. And yea, I agree.. having both audio and horsepower as hobbies can get expensive very fast. I've done that on a few of my past cars where they start to become not as fun as a DD. Definitely not the route I'm trying to go with this car, but who knows what will happen haha.
-
Thanks for the info. More pics would be nice Also what are exact sizes and offsets of your wheels and tires. I am seriously getting ready to order em up. Are the wheels in gunmetal. Thanks. I honestly don't remember the offsets of the wheels, but the sizes were 19x9 and 20x10.5. The rears are the deep concave versions. Tires are Toyo Proxes 4's and 295/30/20 rear and 255/35/19 on the fronts. Here's some more pics: IMG_0272 by riored4v, on Flickr IMG_0275 by riored4v, on Flickr IMG_0279 by riored4v, on Flickr IMG_0281 by riored4v, on Flickr IMG_0280 by riored4v, on Flickr IMG_0274 by riored4v, on Flickr
-
Yea, they are definitely big on the scales. But they're damn quick. This is my 8th or 9th mustang ranging from 87 to present, and so far its by far my favorite. Super quiet, fast and comfortable. Plus I dont think I would have ever trusted one of my H/C/I foxes to make super long road trips like I have with this car haha. The shifting thing..yea, it was a little weird for me at first also. Especially when you come from a fox where you are basically on top of the shifter. I've grown to really like it. Armrest makes for really comfortable cruising and when you want to rip a gear, you don't notice the different location at all.