Leaderboard
-
altoncustomtech
SSA Regular8Points3,836Posts -
nem
Super Moderators7Points18,366Posts -

Mark LaFountain
Admin4Points16,279Posts -
Tirefryr
Super Moderators3Points30,516Posts


Popular Content
Showing content with the highest reputation on 03/12/2012 in Posts
-
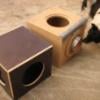
2 pointsGoing to be doing a bit of upgrades to the truck which include... New JVC KW-NT700J Navi unit 1 15" ZCON (on 4kw RMS) 1 15" Custom Enclosure built by Ricki30 from Alerion Enclosures, Tucson AZ Completely custom fabbed steel false floor skeleton for the back end. I plan on mounting all my amps under the false floor, leaving myself a blank slate above it to install various boxes for testing etc... I will still be using my MTX TE4000Ds & TE1004s1 point1 pointXcon would make me want to feed it the SAZ 1500 and I dont think im ready to throw and extra 3-400 on it :/. I could buy from db-r but kinda wanted everything new cause im picky like that. The xcon would perform great on the 1200, no point in getting the 1500 because you wouldnt even hear a difference between two1 point1 pointOh don't you know it! Yep, makes ur mouth water don't it? Okay, so got a little work done this weekend. After visiting the ER with a 103.8 degree fever Wednesday it took me a few days to recover, missed three days of work, and between cold chills, sweats, naps, and the always fun intake/exhaust gastrointestinal evacuations that always seem to accompany getting that sick I felt good enough to do a little work on the Jimmy Sunday. The problem with getting that sick is that it takes awhile to get back to 100% capacity so after I got the driver's door done yesterday I just didn't have it in me to dig into the passenger door. However, I think I chronicled the drivers door fairly well. Onto the pictures: The before shot. The door as it was before I began with the PG RSD components installed. The mid mounted in the flimsy factory plastic baffles and the factory grille removed. The door card removed. I forgot to chronicle the installation of the CCF on the doors, but as you can see here the healthy helping of CCF has things well covered. I didn't put any over the window motor so that it can be changed/removed a bit easier in the future. Also if you notice the wire going to the tweeter I did a quick and dirty install of the PG's and never put any sort of disconnect on the wires which has been a bane of working on this thing without tearing the wires out of the back of the tweeter. That will be addressed and fixed during this stage of installation as well. The PG mid removed, bye bye crappy, flimsy factory plastic. Now you see it. Now you don't Ah, the Bravox CS60K's that will be replacing the PG's. Beautiful set and well built. The tweeter is mounted in the tweeter cup from an Alpine Type R set. Got them from my bro Jared (j-roadtatts) to help the Bravox tweets fit the gaping hole that the PG tweets required even though they're both 1" dome tweets. If you look closely you can see the dab of hot glue I put on the back of the tweeter to help hold the wires. I've had tweeters like this with wires torn out cuz of how they attach and have almost no support. Doing this just helps ensure they don't do that easily. PG tweet out, notice how large that freaking hole is. Just crazy! Bravox tweet is in! Now, I mentioned earlier I wanted to make it easier to remove the door panels without tearing up tweeter wires. I picked up these simple molex connectors from RadioShack. Got the male connector on. Also, notice the CCF on the door card itself. I placed it over the location where the opening remains at the window motor and mechanism to continue to help block noises and rattles at that location too. The female end of the molex connector installed. Now onto the meat of it. I've applied some CCF speaker gasket tape around the opening of the door for a couple of reasons. One, it's just another way to help decouple the baffle from the door. Two it will help seal it, obviously. Third it gives the baffle a little "wiggle" room by tightening and loosening the bolts around the baffle it allows for just a tad of adjustment. Got the baffle bolted up. Turned the one bolt around so it wouldn't interfere with the window travel. Here's the Bravox mid mounted to the baffle. As always I have speaker gasket tape on it too. Damn does it look good in there! Another quick shot of the door card. The new tweeter connector all connected up. Viola! Completed, er, well for this door anyway. Well, that's that for now. I'm on call at work all this week so I won't be getting much done on the Jimmy with it parked at work. Hopefully the Singer 250A will be in before the end of the week and I can get it and the rest of the goodies that came in last week while I was sick installed while I'm on vacation next week! WOOHOO for kids spring break!! New XS Power XP950 battery for the rear of the Jimmy and a 34/78 Intimidator for under the hood. K&N Cold Air Intake for the Jimmy, The "Piece de resistance" PCMforless performance tuned PCM Thanx for lookin' guys!1 point1 pointAlright I just got done ripping on the XCONs for about 30 minutes and yes they get warm, but understand I was ripping on them hard. I played everything from Yello (Touch) to the Decaf mixes so they were flexing hard and well the truck is taking the beating like a champ. With out the pollyfill in, the subs seem louder to the ear, but the box volume is almost spot on with their optium specs. I am loving the tightness of kick drum and the lowness of Yello's music. I believe as these beasts continue to loosen up it will get louder and more painfull. This is going to be an ongoing, so you never know.1 point1 pointIt wasn't an official Board meeting unless we were in SSA gear.1 point1 point1 pointMy little helper and I removed the polly fill today. I have not listened to it yet, but I will let you know what I think. Here is a picture of my helper.1 point1 pointFunny stuff. I guarantee that given the parameters here, I could throw 1 of each of the woofers in the given alignment and only two or three people in this thread could pick them out. You have a couple good drivers mixed in with great drivers. Seriously, the only difference YOU will notice will be the looks and price.1 point1 pointBarely 8 hours of sleep since Thursday. Good news is I should land at 12:30 and home by 1:30. Then I can sleep the rest of the day.1 point1 point1 point1 pointWell, I know you've all seen sub unboxings before and at the risk of being a complete and total bore I'll show the unboxing of the 10" XCON anyway. Mainly because I know how much you guys love sub porn!! First impressions are that this thing has a nearly inexplicably large motor, lol. Not really but the size of it makes removing it from the shipping box without destroying said box nearly impossible. I seriously wonder how the hell they pack them without tearing up the box. Of course the build quality is second to none. Everything is perfectly lined up, no excess glue, just perfection. I can't wait to hand this to a couple of good friends and see the looks on their faces!! Did I mention the motor on this thing is massive? Huge? I loved seeing the number of tinsel leads on this thing. Much like my Q's there's more than enough tinsel lead there to handle all the power this thing can take. Well, those are my first thoughts. I'm quite possitive I'm going to love the new setup I'm looking at doing. I'm really looking forward to getting the PR's in and getting this bish completed finally!!1 pointI'm hoping this staff meeting took place at a titty bar, and the pics will be of the naked women.1 point1 point1 point1 point1 point1 pointThat note at the end there makes them look like they are doing the worm. It does look pretty funky on the video, but man it sure is brutal!1 point1 pointI know when people ask a general question, we give our opinions and advice. I didn't specify what brand it was. So would your answers be the same if I chose ss or sds? I know only 25% of coverage. But I asked for a single full layer.1 point1 pointI know you think the owners a douche bag and the products arent worth it. But that wasn't my question. Will 50sq ft be enough for 1 layer around my truck possibly? I'm not trying to sound snobby or anything. I just came to the forum knowing y'all would say bad things I'm just trying to get a straight answer.1 point1 pointGot the liner on the baffles. I really like how they turned out so I'm positive at this point that's what I'm going to do to finish the enclosure and the amp rack.1 point1 pointOkay, so I'm finally getting a little something done on this. I'm working on completing the door baffles for the Bravox CS60K components so that I can get them installed then get the amp rack built and installed. Hopefully by then the last 8 will have sold and I'll have the XCON and it's PR's coming and a box getting built. Here's the first one with the back cut out. And the second Here they are side by side, and no the holes aren't done yet. I think I've said it many times before, but I love routers. They're versatile and handy tools without which many things in this hobby would be very difficult to build. If you don't have one, go buy yourself a couple, lol. Here's mine getting ready to clean up those cuts with a 1/2" x 1" flush trim router bit. Made this job EASY. It only took 5 minutes to rough cut the holes with the jig saw, it only took 2 minutes to clean them up. Here's the finished holes. I've got them hanging there for sealing purposes. I'm applying some polyurethane to help seal the MDF first. Then I'm going to be covering them with bed liner. That's it until I get the bed liner picked up.1 point1 pointTell me what you guys think of this..... This is why I have some things to clean up. I wasn't thinking about mounting hole cutout size when I built the frame, so in this pic the spokes go through the MDF. It won't be long before that's all cleaned up and looking much better. Notice, I even have the "SSA Proudly built in the U.S.A." flag sticker on the back of the sub. I'm completely remodeling the sub to clean up some things, but I think this looks pretty damn decent IMHO.1 point1 pointOkay, I've made all my decisions and will be going with a single 10" SSA XCON with two 10" SSA XCON passive radiator's, thanks to Denim and Nick from Fi for allowing me to pick those up too!! Box is 1.75cuft NET, will be tuning PR's in the 32ish neighborhood. These drawings should give a great idea of what it will look like when complete. Thank you again to Denim for letting me get creative with Sketchup and model the XCON for these drawings. On to the pics..... I've got some more fine tuning to do, work on the paint, interior of the box, etc. to do with it, but this is basically the final design. Thanks for looking.1 point1 pointTrying another design. Angled front this time around. It's still in the 2.75cuft neighborhood if the math is right and gets the viewing window up to 11" of viewing area. I don't have a saw worth a crap for doing angles, so anybody who does some professional box building who's got some insight on this one, please chime in or PM me.1 point1 pointHere's the basic box design for the PR's. It will be 2.55cuft for the 12" XCON and 1.75cuft for the 10". Of course the 10" box will be a bit smaller, but this configuration is about the only way I can fit all of it together. I REALLY want to have some plexi in this thing so everyone can see the sexy ass of the XCON. I'm still hoping the 8's sell soon, I'd like to get the order in for the XCON and the PR's soon. I'm trying to line things up and get this build going again very soon.1 point


Account
Search
Configure browser push notifications
Chrome (Android)
- Tap the lock icon next to the address bar.
- Tap Permissions → Notifications.
- Adjust your preference.
Chrome (Desktop)
- Click the padlock icon in the address bar.
- Select Site settings.
- Find Notifications and adjust your preference.
Safari (iOS 16.4+)
- Ensure the site is installed via Add to Home Screen.
- Open Settings App → Notifications.
- Find your app name and adjust your preference.
Safari (macOS)
- Go to Safari → Preferences.
- Click the Websites tab.
- Select Notifications in the sidebar.
- Find this website and adjust your preference.
Edge (Android)
- Tap the lock icon next to the address bar.
- Tap Permissions.
- Find Notifications and adjust your preference.
Edge (Desktop)
- Click the padlock icon in the address bar.
- Click Permissions for this site.
- Find Notifications and adjust your preference.
Firefox (Android)
- Go to Settings → Site permissions.
- Tap Notifications.
- Find this site in the list and adjust your preference.
Firefox (Desktop)
- Open Firefox Settings.
- Search for Notifications.
- Find this site in the list and adjust your preference.