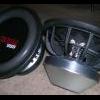
January 16, 201016 yr Author Guess I didn't put up pics of the box when I finished it..The rear deck is going to get carpeted too since it was badly sun damaged. I'll get the car tinted sometime down the road to prevent this from happening again. Here's the deck after a scrubbing with a wire brush. It got a little fiberglass reinforcement behind it too. I didn't take a pic of it before the scrubbing cause it was super ugly lol.While waiting for the resin to dry, I FINALLY finished the box.Carpeting it took like 5 hours because of the sides. I wanted something a little different than the 'gift wrapping' style, so I thought a slope would look nice.Installed the rest of the damplifier pro today. Took about 4 hours because it got dark and someone decided to ditch a car in the grapevines about 200 yards away and torch it. It's only about the 4th time it's happened on my street within 2 miles from my house. I suppose a quiet country street is the best place for it.AnywayHere's the door before applicationThe target area was the outer shell. I abandoned my initial goal for 60% coverage when I heard a wonderful stereo in a brand new Shelby Mustang at Audio Innovations because they told me that there was a ****load of deadening in each front door. So I used all of what I had on my front doors.I started with the small cuts left over from when I did the trunk lid. Only the passenger side looks like a Picasso painting, the driver door is almost total coverage with large squares of damp with very few little cuts.After I covered what I could reach on the outer shell, I covered the key areas on the inner metal. A little more tricky, but still easy.Here is where I remember applying the damplifier pro on the reverse side of the inside metal. I didn't put it on the outside because I didn't want to completely remove the plastic lining because the glue that holds it in place is a real pain to work with.I can't give a review on it yet because I've removed the fiberglass panels that hold the speakers to finish smoothing them out and to have them carpeted next week- my last week of vacation. When I get the panels back, I'll put them in and give a review.
January 16, 201016 yr What did you use on the inside of the port area? Was it just black spray paint, any sanding or primer added? When I built boxes I never did this and seen many people who have and was curious since Im building a new box sometime next month.
January 16, 201016 yr 2 coats of primer, then like 5 coats of blackDoes it benefit the sound some how, Im assuming it does since you and a lot of people do it? Thanks for the info and good luck with this install
January 16, 201016 yr Author I don't think it improves the sound. If anything, it would change the tuning but reducing port area. But since the coats are so thin, its negligible. The reason for me painting the port is entirely for aesthetics. Some may argue that the paint as a liquid will cover the pores in the MDF, but I don't know if that really makes a difference.
January 16, 201016 yr Ok well that is all that I needed to hear, probably wont do it but will use the painting tips you gave for when I paint the outside of the enclosure.
January 17, 201016 yr Admin man I am so bummed that I didn't see this build log before. this is some great stuff. nice work blue
March 24, 201016 yr Author Doors are finished. Its not good enough looking to be in a magazine, but good enough for me.Audio Innovations in Fresno gets the credit for carpeting and painting the pieces I made. This whole thing is so close to being finished. I'm going to take it to AI to have them fix as much of the hiss and whine issue as they can whenever I get some money and some time off. After that, it's just a matter of hiding all the wires, and fixing up the hole in the back seat, then it's done! Wooooowooooooooo!!
Join the conversation
You can post now and register later. If you have an account, sign in now to post with your account.