Posted August 16, 201312 yr Hey friends, just wanted to share my most recent build with you all, my first Solo X 15. This was a challenging sub to build, but a lot of fun. Big thanks goes out to David, Rusty, and everyone who had a hand in helping make this happen (too many to remember). A lot of people stepped up and helped out, but none more than the man himself, David Moore@PSi. He and Rusty answered every question I could come up with, and without them both, this would not have happened, period. So thanks guys, it really means a lot! So I started with an idea to build a Solo X 15. Little did I know it had already been done, multiple times by PSi. (Check it out) So, I began talking to David about doing some for my PT, but had a problem with how they were going to end up. See, until now, the most any Solo X has been built for daily on music was ~2K, and the reason was simple: the coil. Kicker did some really nice things with the design of this motor, but they screwed themselves by only using a slim 4 layer flat-wound coil in a tight gap. 5K RMS is a fantasy, and no Solo X will last long with that much power. So I got to thinking... how could I improve this? So while thinking, I started buying up motors. I found three right off the bat. But one was a little rough, with a scratched up bottom plate, and no motor boot. And when I removed the frame, the top plate shifted on me. This wound up being a blessing in disguise. To fix the shift, the top plate had to come off.Once it was off, I got an idea. And after talking to the right people, my idea was verified. The idea was simple: cut the gap a little bigger to fit an 8-layer coil. So I took it (top plate) to my local Harley shop, to have their machinist cut out the gap, drill the new bolt holes, and cut the center of the new frame, so it will sit down on the top plate flush, the way I want. When everything was done, it looked like this. So now they were almost ready to be re-married, but first, I wanted to do a little work to improve the looks. And, I had an idea on securing the top plate. So...See what I'm doing here? Notice I did away with all the old unnecessary bolt holes.And finally, she's ready to go back together. Then once I got it down right, and all 4 posts secured, time for more body work!
August 16, 201312 yr Author And after several hours of sanding, filling, etc, this is what I got.Then some colorFor the frame as wellHmm don't she look sexy!So then I joined the frame and top plate. I chose to use bolts/ lock washers and glue. She ain't going anywhere.Then I decided to add screen to protect the coil. It is aluminum window screen, I just cut it and added some black paint.Then glued them in place, one by one.Then once that was finished, it was time to address the bottom plate. Ready for paintAnd the bottom plate is painted!So now after looking long and hard, I finally found my coils! We are ready to put this beast together! More on the way...
August 16, 201312 yr Author One the left is the 4 layer, on the right is the 8 layer for this build. Lets compare! For the ones going in my car, I will use the 4 layer coils. But that's another build Now let's see how well the 8 layer fits in it's new home..So now onto the suspension. I used a linear roll quad, spaced TC sounds spider pack. Bottom two were first, after cleaning the frame.You may have noticed the nylon band used to glue the bottom side of the top spiders. That worked perfect!But before glue, I soldered the leads.Sorry, didn't take a lot of pics of the cone going on, I had my hands full. But here it is right after, when I was doing the direct 8g leads.Ready to rock and roll! But of course I had to wait on more glue to finish it up.Here we go, CA on the spiders and some nice rubberized stuff for the surround. And now to dryCoil check shows exactly what they did before, awesome! And that is where she sits, still waiting for the dust cap logo to be printed and installed. So stay tuned, I will update this with final pics, specs, and numbers. As well as some vids in action. So thanks again to all involved, and keep watching, this is only the beginning for me!
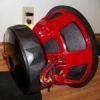
August 16, 201312 yr Author Oops, I almost forgot the butt shots...The black ring around the center is a "scuff pad" I came up with, to protect the paint. It is a just black vinyl ring, it can come off easily to be replaced. It works!Front shots will have to wait till I get the logo and dust cap installed. Shouldn't be long...Thanks for lookin', and for all the kind words. I appreciate the support!
August 16, 201312 yr Pretty cool what some of you guys can do on the kitchen counter.LOL Love the attention to detail!
August 16, 201312 yr Author Pretty cool what some of you guys can do on the kitchen counter.LOL Love the attention to detail! Lol! Yeah a guys gotta do what a guys gotta do. Thanks man! holly shit that was alot of work... you must love those motors. great work btwYeah it was a lot of work, but I really enjoy doing this kinda stuff. Not sure if I love these motors, I haven't actually got to hear one yet, besides a burp. But the goal was to come up with something different, and that I did. I'm happy so far. And thank you for the compliment!
August 17, 201312 yr Author amazing work and detail! man u sure have got alot of patience - lol excellent workThanks I appreciate that!
August 17, 201312 yr you sure did get out of the box... i know alot of people that wish they had your skills ... now that recones are no mas
August 17, 201312 yr Really nice work man. Definitely impressive. I love the color choices. One thing though, I don't know what people get so stuck on "4 layer/8 layer" Winding thickness accounts for more imo. You can have two 8 layer coils but one with a thicker winding and you might end up with double the thickness. Now get it installed.
August 17, 201312 yr I looked at all your build log on the other forum and have to say that It's impressive what you went through with all the work.
August 17, 201312 yr Author you sure did get out of the box... i know alot of people that wish they had your skills ... now that recones are no masThanks man. And yeah I know what you mean... but now all anyone has to do is get at me, I can fix them up better than they ever were! Really nice work man. Definitely impressive. I love the color choices. One thing though, I don't know what people get so stuck on "4 layer/8 layer" Winding thickness accounts for more imo. You can have two 8 layer coils but one with a thicker winding and you might end up with double the thickness. Now get it installed. I know what you mean, and totally agree with you. But on this motor, it takes a 3.5" coil. Now I looked everywhere, and there are only 2 places that I could find on this planet to get 3.5" coils, and I got both. Now one (PSi) only offers the 4 layer version at this time, while the other (not allowed to say who, but it's not hard to figure out) uses the 8 layer. Both have the same ID. But in order to fit the 8 layer, I had to cut over 2 mm out of the gap. Reason; the 8 layer windings are much thicker. Also, PSI will tell you these 4 layers will not take much more than 2K, while the supplier of the 8 layer rates the subs they use them on at 3K+. It was a pretty simple upgrade if you ask me. But I agree, it's actually the thickness that makes the most difference. But usually an 8 layer will be thicker than a 4 layer, and that's why people get so stuck on them. Everyone wants I looked at all your build log on the other forum and have to say that It's impressive what you went through with all the work. Well thank you, I appreciate that! I'm going to try to get my build log up over here, so I can just flat give up on "that" site. I'm tired of being treated like a piece of shit. They absolutely do not realize what all I do for them over there. But oh well... there loss.
August 17, 201312 yr Author Well, yesterday I picked up the vinyl decal I had printed, and then proceeded to mess both of them up. Here is what I had in mind.But here is what went wrong. So here is what I'll probably end up using (except I have a brand new one I'll use)So what do you all think? Should I have another SX logo printed, and try it again? Or just go with the silver carbon fiber one?
August 17, 201312 yr First off, awesome work! I've never been a fan of carbon fiber. Personally, I'd like to see you carry over the metallic black on the motor to your dustcap.
August 17, 201312 yr Author First off, awesome work! I've never been a fan of carbon fiber. Personally, I'd like to see you carry over the metallic black on the motor to your dustcap.That is an excellent idea, thanks man!
August 20, 201312 yr Author Well I now have specs on this beast, anyone interested? Any guesses on the fs?
August 20, 201312 yr Author 34hz, post the parameters pwease 34 Man, I wish... Remember this guys has 4 med. stiff spaced spiders, and an AR cone. Better think a little higher... I built it to play music, but be a beast on burps....
August 20, 201312 yr I know what you mean, and totally agree with you. But on this motor, it takes a 3.5" coil. Now I looked everywhere, and there are only 2 places that I could find on this planet to get 3.5" coils, and I got both. Now one (PSi) only offers the 4 layer version at this time, while the other (not allowed to say who, but it's not hard to figure out) uses the 8 layer. Both have the same ID. But in order to fit the 8 layer, I had to cut over 2 mm out of the gap. Reason; the 8 layer windings are much thicker. Also, PSI will tell you these 4 layers will not take much more than 2K, while the supplier of the 8 layer rates the subs they use them on at 3K+. It was a pretty simple upgrade if you ask me. But I agree, it's actually the thickness that makes the most difference. But usually an 8 layer will be thicker than a 4 layer, and that's why people get so stuck on them. Everyone wants Very impressive to pull the top plate off and have it machined. Makes me regret selling my solo x motor. Nice work dude, congrats on the fine craftsmanship. A+
August 21, 201312 yr Author I know what you mean, and totally agree with you. But on this motor, it takes a 3.5" coil. Now I looked everywhere, and there are only 2 places that I could find on this planet to get 3.5" coils, and I got both. Now one (PSi) only offers the 4 layer version at this time, while the other (not allowed to say who, but it's not hard to figure out) uses the 8 layer. Both have the same ID. But in order to fit the 8 layer, I had to cut over 2 mm out of the gap. Reason; the 8 layer windings are much thicker. Also, PSI will tell you these 4 layers will not take much more than 2K, while the supplier of the 8 layer rates the subs they use them on at 3K+. It was a pretty simple upgrade if you ask me. But I agree, it's actually the thickness that makes the most difference. But usually an 8 layer will be thicker than a 4 layer, and that's why people get so stuck on them. Everyone wants Very impressive to pull the top plate off and have it machined. Makes me regret selling my solo x motor. Nice work dude, congrats on the fine craftsmanship. A+ Thanks man! I figured you would like that. Thinkin' outside the box, just like you She's a whole different animal now, and I feel more sentimental about this sub than I probably ever will for any others I do. Hey btw, you ever want to sell that horsey, or do some trading, let me know. My car needs a horsey. And I will most likely be building a box for this sub that very much resembles the one you built for your SMD's. Hope that's okay, I just want to show this girl off!
Join the conversation
You can post now and register later. If you have an account, sign in now to post with your account.