Leaderboard
-
outhopu
Members15Points329Posts -
onebadmonte
SSA Regular2Points1,823Posts -
Impious
SSA Tech Team1Points6,708Posts -
NB50
Super Moderators1Points2,663Posts


Popular Content
Showing content with the highest reputation on 07/15/2010 in all areas
-
1 pointI got started on my boys Caddy this week. The goals: 1. Build a very solid daily system to pump the sounds while riding. 2. Take up as little trunk space as possible. (Need space for hydraulic set up) 3. Make it a clean install worthy of popping the trunk for. 4. Put some JL system to shame while spending a fraction of the cash. The gear: Kenwood head unit. Infinity 6.5 components, 2 sets 12" Fi IB3 subs, trying to fit 4 but may end up with 3. Sundown SAX-50.4 Sundown SAZ-2000D Lots of 1/0 cable Undecided yet on electrical system. more to come... Here is the ride. Started doing the front doors. I stripped the carpet off and used the press board as a template for my MDF Flush mounted the tweeters in the arm rest as high and far foreward as possible Doing a test fit. I need to try to find some carpet to cover the MDF. I think I'm going to paint the grilles for the speakers also. The silver clashes with the interior. Got the other door done and moved on to the subs. The subs are designed for infinite baffle use so no box needed. I do however have to seal and brace the rear deck and seat back really well. I made the new rear deck piece to start with, and sorted out where the subs will sit. Then I made a trim piece to flush the subs into. I made a circle jig for my router. This thing is a life saver. First time ever that I've cut speaker openings correctly the first time. It also cost almost nothing to make which is a plus. Test fit the trim piece. I still need to router the edges and do a little sanding to get the shape I want. Figured I'd get a couple pics of the sub.1 point
-
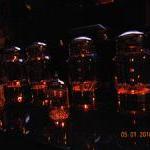
The goal 140. My previous attempt netted me a 135 and change at 32Hz. You can see my previous build here: Original Build This time I'm upping the anty with a pair of 18s and double the power. A mind boggling 900 watts. That's 900 old school class A/B watts via US Acoustics USB line. Why you ask? Because, they're cheap. The 2150 average about $100 bucks on ebay and the 2080 were about $40, which includes shipping. Here is a run down of the setup: The car: 1994 Oldsmobile Cutlass Cierra A.K.A The Cream Puff Head Unit: JVC KD-HDW10 A basic CD player with a built in HD tuner and RCA outputs Amps: 2 US Acoustics USB-2085 both at 80 watts x 2 @ 4ohms (mids and highs) & 2 US Acoustics USB-2150 both at 450 watts x 1 @ 4 ohms (subs) Fronts: Powerbass 3.5" coax in stock location Rear: MTX Thunder Axe 5-1/4" components Subs: 2 Fi IB3 18" Electical: Stock I'll start off with a quick tear down. Amps coming out. My beloved US Acoustics USB-4085. They'll be back later on for a fully active system experiment. Bye, bye Ascendant Audio Atlas 15s. You were truely one of a kind. You will be missed. Here is my artistic shot from the trunk. The great wall coming down. This on is at a funny angle A side by side of what going in versus what came out. Here is a side shot. the 18 dwarfs the 15. Here is the backside. I've got my fingers crossed that these 18s will make some serious noise. More to come.1 point
-
1 point
-
1 pointGo seald of you want a flat response. You should still be able to get the ouput you ate looking for too. Those xcons are beasts.1 point
-
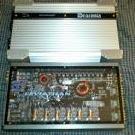
1 pointWell, I don't have a schematic and haven't tried to trace the components on the board, but my rudimentary understanding of passive crossovers would lead me to believe the following: The large cap and large inductor are a 2nd order lowpass (12db/oct electric slope) for the midwoofer. [outlined in red] The small cap and small inductor are a 2nd order highpass (12db/oct electric slope) for the tweeter. [outlined in black] The two resistors are probably for the tweeter attenuation circuit. [outlined in green] The two polyswitches are tweeter protection [the arrow] I don't have the ability to measure the inductance of either inductor so I don't have a means by which to nail down the crossover point.1 point
-
1 pointFEA optimized. Really, number of magnets is only part of the solution. The way the top and bottom plate are configured and , gap height, how tight the coil is in the gap etc. all have an effect. So in other words simply FEA optimized.1 point
-
Today I worked on the baffle spacers and the baffle itself. The baffle is two layers of 3/4" MDF. The subs will be flush mounted, so the first layer of MDF will act as a spacer. The baffle will be spaced back from the seatback sheetmetal 1-3/4" with strips of wood. The strips and baffle will be attached with some 1/4" bolts and some threaded inserts. Well enough of my blabbing here are some pics. Here is the insert I'm using. This is what you get with IKEA furniture. You can buy them at Home Depot in 4 packs. I recommend ordering through Mc Master Carr. What 5 packs cost at Home Depot you can get a pack of a hundred through Mc Master Carr. All you do is drill the hole and thread them in with an allen wrench Viola! Nice threaded hole for a bolt. Here is one of the baffle spacers installed Up next is knocking out the center brace, it's too wide. The opening in the car is 40" wide. The baffle spacers over hang an inch to give me a mounting flange for the baffle. That leaves me with 38". I'm going to use an inch wide spacer down the center. After that I'll have 37" exactly what the OD of the 18's measure. Here's the center brace out. Yes I used a dremel. Here is the new center brace. 1" wide 1/8" thick metal strip. With all the wood strips on it should be plenty rigid. Here is an up close of my weld job. Flux core wire FTW! I know, I suck. Don't worry my flame suit is thick. Oh no! My first hiccup. The baffle is too wide to fit in through the rear because it's wider than the shock towers. To make things worse that welded brace is going to need to be removable to get the baffle in and out. Double FAIL! Calling it quits for today. Tomorrow should be better. LOL!1 point
-
1 pointWell here is a little more of the rest. Got the head unit mounted today. This was in the way. But not for long. This was a bit tricky. I made a few brackets to make sure the unit is held properly. I'm sick of using shit plastic adapters that look like shit and just end up breaking. The bottom bar spreads the load over a large surface to keep the dash from cracking. Just need to make a trim piece to fill the gap now.1 point
-
1 pointI merged the 2 threads, since they were the same. I felt it belonged in the IA forum, but if the OP prefers it in the subwoofer forum, where the other one was, just PM me and I'll put it there.1 point
-
1 point
-
1 pointLots of smack coming from someone with nothing to show! I'm not allowed to have an opinion? Honestly? It's an Eclipse, for a teenage guy. It fits perfectly. Still ricey, though Oem lip kit, some suspension, and some low offset wheels would make that eclipse look amazing. If this is gonna be a show car, OP should know what's in and whats out in the import world. You can have your opinion but until you can show that you can do better or have something better then .... This is a father son project with a lot of hard work and hours put into a project that will last a lifetime. We all could only wish we could have an oppurtunity like this! Posted these on here before Btw, who cares what kind of project it is.. am i not entitled to have an opinion on the car? I think he went the wrong direction with it.. Everyone is gonna have an opinion..it's no different than folks who get bashed for using kicker and other mainstream brands. On a brighter note, OP gets props for doing this with his son wish my dad was into cars like that1 point
-
1 point1 point1 point1 point1 pointGot a little more done after dinner. I sorted out how I was going to mount them and counter sunk some 1/4" bolts into the board. I filled over them with body filler (you can see in the last pic). I will do a backer board on the back side of the panel and sandwich the door panel between the two. I laid down a very light woven cloth over the foamed areas to seal them and make it rigid enough for filler. It's almost not visible once it's wet. It lays down very nice and doesn't pucker and lift around the rounded corners like a heavier weight or chopped mat does. Decided to wet the whole board down to help seal it so it won't soak up the primer so much hopefully.1 point1 pointI made some better progress today. They look like something now. All trimmed and close to final shape. Then I removed them and sealed up all the edges and openings to allow me to pour the foam in. Did a rough sanding to get the contours sorted out. Bolted it back on the door panel for a test fit. I think it's looking real nice I just need to work on the transition from the edge of the baffle to the bottom board now. These should look real clean once they are perminetly attached. The door panels have a nice layer of foam under the vinyl/leather so the pods will squish into the door giving it a nice factory look.1 point1 pointDidn't get much done but I at least got the base layer of glass done that will give me the contour of the door. I didn't get pics of each step mainly due to how quickly I had to work to get everything done. I first did a coat of thinned filler to get a good smooth finish on the back side and then layerd the cloth on before the filler set. I should be able to pull and trim them tomorrow. Then I'll do some 2 part foam and get busy making them look like something.1 point1 pointI'm going to try to get focused on this project again. I'm glad I took a break from it though since after not looking at it for a while now I realized I wasn't happy with the shape of the door pods. I reshaped the speaker baffle a little and got the passenger door started to match. I need to pick up some resin tomorrow and see if I can make some real progess. The heat is killing me though, was 100 degrees today and I don't even have A/C in the house to be able to take a break and cool off.1 point1 point1 pointWell like I said before I wasn't really happy with the doors so I started to rework the drivers door today. Made a new panel with a recessed area to allow the speaker plate to be angle mounted . I used 1/4" hardboard for the under layer then 3/4" MDF for the trim piece to do a semi flushed grill. Glued it together and did a mock up of it. May change the angle a little. Used some body filler to flush the lower half of the grill into the board. Still needs another layer of filler and more sanding. I'm much happier with the way the speakers are looking now.1 point1 pointI found some bootleg suede that is almost a perfect match to the headliner and rear pillar material. So I decided to give it a try. I started with the trim bezel for the subs since it seemed like it was going to give me the most headaches. First I had to sort out how to fasten the bezel before covering it. I used T nuts again with a recessed pocket via the router. Then used filler over them. I taped over them to keep filler from getting in the threads. I'm going to just use a few screws at the ends since the wood is too thin to use the T nuts. Filler sanded and ready to be covered. This was not easy to get it all to lay down smooth and wrinkle free with all the curves and routered edges. It came out real nice though. Especially considering I've never really done it before. Nice and smooth even on the round ends. I'm thinking I'll do the same to the face and top and just do a textured paint on the back side.1 point1 pointI test fit the rear seat back before removing the baffle board. Fits nice, the seat still sits higher than the board. Installed T nuts for subs and bolted the brackets on. Used T nuts on the bracket mounts also. I recessed the area with the router and cut the bolts flush so I can cover them with filler. Started with the filler. Did some more bracing while the filler was setting up. More 2x2x3/16" angle with a 3x4x3/16" foot. The foot rests on the boxed section of the body for strength. Just have a couple small tabs to weld on and the bracing is done, then onto finishing the board.1 point1 pointI've always liked this ride. It's not super flashy but still turns a lot of heads. I'm busting ass on the audio so I can get onto redoing the hydraulic set up. Once all the batteries and pumps are installed there's no way of getting in the trunk to work. Made a couple more brackets for mounting the top to the body. Used some 3"x3/16" flatbar. It will get welded in later. The rear mount.1 point1 pointI put another platform on the rear of the baffle to rest on the trunk floor to spread the load over more surface. I used 2 layers on it also. I also added a couple strips on each side to remove the step and put a routered edge on it. I'll fill the seam before finishing it.1 point1 pointGot a little more done. Added the pieces needed to box off the front of the middle sub and did the filler pieces on the corners. I'm going to hand sande the radius a little more but it's close. I want to try to keep away from any hard corners or edges for a more finished look. The bottom now rests on the trunk floor to help support the weight. I will be bolting it down to the trunk on the doubled layered section up front.1 point1 pointMaking progress. Glued and screwed the front baffle on and added some bracing. I plan on doing more bracing still. Test fitting with subs. 4th sub was set in place to check for clearance on the middle sub, it was close but cleared. It's going to be real close on cylinder clearance for the hydraulics. I may change the top baffle to angle the subs forward for more clearance.1 point