Leaderboard
-
The enD
SSA Regular2Points3,835Posts -
sundownz
Vendors2Points8,101Posts -
Impious
SSA Tech Team2Points6,708Posts -
Optimus_Prime
SSA Supporter L11Points812Posts


Popular Content
Showing content with the highest reputation on 05/31/2011 in all areas
-
1 pointhttp://www.monsterca...tor_Article.pdf DAMPING FACTOR By Richard Clark At a recent AUTOSOUND 2000 manufacturer sponsored seminar, we were asked to comment on the subject of amplifier damping factor. I was extremely surprised to find how much importance was attached to this single specification. Since most folks are a little unclear as to the true meaning of damping factor, we're presenting the following article. First of all, let's discuss the items that enter into the damping factor calculation. At the heart of this calculation is the output impedance of the amplifier. Most all-modern feedback type amps are of the variety known as constant voltage. This means that they will deliver a constant voltage regardless of their load - at least in theory. Sooner or later the limits of the amplifier's design will prohibit its constant voltage characteristics. It is this constant voltage output characteristic that permits modern car audio amplifiers to deliver more power into a 2 Ohm load than into a 4 Ohm load. A perfect amplifier should be able to double its power every time its output load is halved. Remember, Power = E x E divided by R. As an example, examine the following chart: 8 Ohms = 25 Watts 4 Ohms = 50 Watts 2 Ohms = 100 Watts 1 Ohm = 200 Watts .5 Ohm = 400 Watts .25 Ohm = 800 Watts .0125 Ohm = 1600 Watts If an amplifier were theoretically perfect, then it would be capable of the type of performance described in the chart. However, there are many factors that influence this capability. First there is the power supply section of the amplifier. Even if an amplifier had an unlimited power supply with output transistors that could handle the current, the design would still not be able to achieve the theoretically perfect output. The reason being that we do not have access to theoretically perfect components. Never lose sight of the fact that real components in real amplifiers are subject to real losses. These losses are a result of junction losses; IR drops in connections and losses in resistances and reactance. Losses in the output stages essentially form a voltage divider on the output of the amplifier. This drop is always in series with the load and can be indicated as in Figure N. In the design of an amplifier, the feedback network is usually wrapped around the section with the most losses. These losses can be greatly minimized due to the fact that the feedback node is constantly being corrected. This can be depicted as in Figure O. Output Impedance Determines Damping Factor If the output impedance of an amplifier is extremely low, the effect of loading on the output of the amplifier will be minimal. This means that it will not experience a voltage loss across its own output impedance. This output impedance does more than determine the effect of loading on the amp. It also determines its damping factor. Whenever a signal is fed into a loudspeaker the cone of the speaker will move. Since the cone has mass, there will be mass in motion. Mass in motion means momentum. When the signal is removed from the loudspeaker, the momentum of the cone causes the energy stored in the cone to be fed back into the amplifier. If our perfect amplifier were connected to this speaker, the loudspeaker would be trying to produce a voltage into 0 Ohms. Remember, a perfect amplifier has an output impedance of 0 Ohms which is essentially a short circuit. A voltage cannot be developed across 0 Ohms because it would require an infinite amount of current. It is this same infinite amount of energy that would now be trying to prevent the speaker cone from moving. If such were the case, we would certainly have a "tight" sounding speaker with absolutely no hangover. The good news is that quality amplifiers have very low output impedances. We are very pleased to report that there are many car audio amplifiers on the market with output impedances on the order of .01 Ohms or less! Calculating Damping Factor Let's clarify a few points before starting our calculations. The frequency of the measurement and the impedance of the load need to be specified. For example, the use of a 1 KHz signal and a load impedance of 4 Ohms would be a typical specification. DEFINITION = A good definition of damping factor would the ratio of the output impedance of the amplifier to the impedance of the load specified at a given frequency. An amplifier with an output impedance of 0.5 Ohm will have a damping factor of 8 when connected to a theoretically perfect 4 Ohm loudspeaker (i.e. purely inductive voice coil.) since 4/.5 = 8. The following chart assumes such a 4 Ohm speaker: Output Impedance Damping Factor 4 Ohms 1 2 Ohms 2 1 Ohm 4 .5 Ohm 8 .25 Ohm 16 .125 Ohm 32 .062 Ohm 64 .031 Ohm 128 .0015 Ohm 256 .0007 Ohm 512 .0003 Ohm 1024 .00015 Ohm 2048 .00007 Ohm 4096 .00003 Ohm 8192 Now, for the bad news; it is easy to see how a race to produce such a high damping factor led to a specification so often quoted by salespeople. The numbers on modern amplifiers (with lots of feedback) can get very large and they are easy to compare. Sometimes we can get caught up in these big numbers and we totally miss the point. Effective Damping Factor (EDF) In the case of damping factor, I believe that it could be compared to the old saying of not being able to see the forest because of all the trees. The only thing that really matters is Effective Damping Factor (EDF). Effective Damping Factor more accurately describes the interaction between a real amplifier and a real speaker. Unfortunately real speakers have a real problem with EDF. This is due primarily to the DC resistance of the voice coil. When we calculate the EDF of an amplifier and speaker, it is absolutely necessary that we include this DC resistance into the formula. Figure P illustrates the inclusion of the speaker's impedance into the EDF. The actual impedance of the speaker may be 4 Ohms. If we measure the voice coil of this speaker, we will probably find that it has a DC resistance of about 3 Ohms. When calculating the EDF effect on this speaker, we must add the 3 Ohms of DC resistance as if it were a resistor between the output of the amp and the voice coil of the speaker. Remember the resistive part of the speaker is the part where the signal is turned into heat. No work is actually done in this resistance. The inductive element of the voice coil is the only part that does work to create sound. This is one reason speakers are so inefficient. Most of the voice coil is a resistive element that can do no work. Someday if we develop room temperature superconductors and can afford to use them for voice coils, we are going to see some really efficient speakers. From the damping factor chart it is obvious that the most damping we can expect from our amp/speaker combination is only about two. An amplifier with a damping factor exceeding 10 times this amount is no longer going to play a significant role in this overall calculation. This would yield a practical limit on amplifier damping requirements to about twenty. There are times when the actual damping factor can exceed this number; one such case would be that of a dynamic loudspeaker in resonance. As we have learned, at resonance a loudspeaker's impedance is at a maximum level. At resonance, the DC element stays the same and only the reactance increases. This means that the ratio gets larger and the DC element becomes a smaller percentage of the total. For example, if the speaker impedance at resonance increased to 40 Ohms and the DC resistance was still 3 Ohms and the amplifier were .1 Ohms, and then the actual damping could be 40/3.1, or 13. This is certainly much better than 2, but quite a bit short of the 100, 200, or 500 claimed by salesmen who unknowingly think this factor so important. Fortunately for most loudspeakers this extra damping happens where they need it the most. This is because at resonance, speakers typically are very uncontrolled and have the least mechanical damping. It is also this factor that enables us to be able to connect speakers in series and not have to worry about losing damping. The actual impedance of the loudspeakers in series is doubled, but the ratio to the amplifier must also be increased by a factor of 2 to 1. The result is no change in performance. It is quite possible that this information may be in stark contrast to current marketing trends. However this does not change the fact that this information is accurate. The best way to achieve total control over speaker movement is with a servo system. Only armed with a quality servo system can effective damping characteristics be achieved. A servo essentially puts the loudspeaker in the corrective feedback loop of the amplifier. This topic will be the subject of a future article.1 point
-
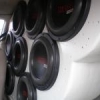
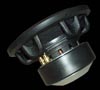
100-watts RMS 8s / $99 each from authorized dealer 200-watts RMS 10s / $115 each from authorized dealer Frequency range is ~80-5000 Hz on these -- the bottom end crossover point depends largely on how much power is ran to them. 8 ohm coils for large setups where you would be connecting 4 per channel to an SAX-125.2 or SAX-100.4 or 8 per channel on an SAX-200.4 These drivers are extremely light and relatively shallow so will fit in many locations easily and also will not weigh down doors with large quantities of drivers as bad as ferrite drivers. Standard Madisound grilles should fit them -- we will test it shortly.1 point
-
1 pointSo here is a lil tutorial for all the people that are not into computers so much or just can't figure it out at the first time. 1. You upload the picture somewhere. If you have it already uploaded that's half of the work. 2. You copy that pictures link. 3. You paste that link between 4. Enjoy. Known sites to upload - ImageShack� - Online Media Hosting TinyPic - Free Image Hosting, Photo Sharing & Video Hosting IMAGE HOSTING - ImageHosting.gr Mobile Photobucket Here are pictures of the how-to: 1. First you go to your site for upload. I choose IS for typical ups. You click browse and a window shows up. From there you choose one or more pictures. For more that one you can hold ctrl and click the ones you want or just select with the mouse. browse, choose image or images and hit open. 2. After you hit Open you click Upload Options / Resizing >> and it must look like the picture below so it does not resize your big pictures to some small ones. Then click Upload Now... 3. After the upload is finished you get this page. You need to click Direct link and it will direct you too the image inself. 4. You copy the images location. 5. You go to the forum, click to post a new reply or thread and you will see next to the smiley face there is a picture with a tree. You click that, paste the pics link there and hit Insert Image 6. You are done. It should look like this. Your link, the code on both sides. And here she is1 point
-
1 pointYou could try a new box for your type-r, try a ported enclosure. That would give you some more low end. As far as the Fi Q, it's a great driver and it digs real low And just because the rms is 1000watts does not mean it needs anywhere near a 1000watts to get loud or sound optimal. Also a capacitor won't help any so don't bother with that. Although a small extra battery in the rear will (depending on how much power you decide to use it may not be worth it though). I would list your max dimensions for where ever your planning on putting the enclosure. Do you have any preference to the sound of sealed enclosures to ported enclosures?1 point
-
1 pointmultiply the fuse rating by 12v to get a very general idea of possible output for amplifiers... Not the best method but can give you an idea..1 point
-
The "BP/LP" button shouldn't matter.....setting the slider to "Flat" should override that feature since you are not using the crossover. The "2ch LP/Mono LP" switch should be set to "Mono LP" to tell the amplifier that it's bridged to a subwoofer (I'm assuming you are bridging the amplifier to the subwoofer). Use y-splitters on the amplifier end of the RCAs to send an input signal to all 4 inputs. Does the H701 have a subsonic filter for the subwoofer output? Do you need a subsonic filter (i.e. are you porting your Ultimo)? I guess if you need a subsonic filter and there isn't one built into the H701, that may change the settings a bit.1 point
-
It is pretty straight forward for the enclosure calculations. You are going to have a line between 5 '- 6' long and roughly the same cross-sectional area as the combined Sd of the drivers. You'll have to stuff and measure for smooth impedance. You will have to calculate the actuall enclosure yourself because you are going to have to figure out how you will fold it up. BTW, this is a big enclosure, it will be roughly the same amount of volume minus all enclosure material displacment as a 6' long 12" diameter sonotube... You can try different taper ratios to suite your goals. I suggest reading Martin King's work before you go any further. If you haven't tackled something like this before or don't have really good fabrication skills, I would suggest a 4th order vented for your application. It would also be about 1/2 the size...1 point
-
Yes and Kinda Following Sundown tradition they will be pretty rugged too... obviously with less x-mech and a smaller coil not quite SA level but more than you would expect from a 500-watt "shallow" driver in this price class.1 point
-
1 pointTake a walk in our shoes for a minute. When you have never done business with a foundry before you have to learn all of their capabilities (which has been the past few months as we decided to move all raw material production here to the states). You also have to learn what their machines can and can not run and how big the dies can and can not be. They have to be machined a certain way for extra material to flow out of them so they can be machined down at a later date. You also have to take into consideration on how you are going to machine the excess material off because in certain places it makes it harder on our lathes and CNC machines here to cut the excess steel bits off. Once you have done an initial die you have to get a few parts pulled off of it, machine them down and finish them..and then you have to approve the design. (Which we have already done) Keep in mind that they are not our own personal foundry here in the states. They have a number of people who are employed there and work there and they fill orders in the order that they are received. So, once we approve the forging we get our spot in line for our certain blend of steel material. As our materials are totally different than any other product that is being used that they make. So, we have to wait for that cycle to come around until they are able to melt our material and add the proper alloys and what not you have the proper chemical make up and metallurgy, otherwise..the magnetic properties of it is far below what it should be and the speakers do not work right. They can not melt our material down and add the proper alloys and what not to make other pieces that they make either. Our blend of steel literally is our blend of steel at this foundry. A foundry does not work like a toddlers play doh factory where you simply put yellow play doh in the die and get spaghetti, and next time you put red play doh in the die to get hair, or switching things up to make hot dogs with the round play doh die out of the orange material. I wish it were that simple, would have parts a long time ago if it was. Now, If I were to call them every day and ask them "Hey when are you running our parts?", "Hey when are you running our parts?", "Hey when are you running our parts?". They would become very annoyed with me. Because I already know what the situation is, and we understand that our materials will be made when their schedule allows. They understand that we need the parts as soon as we can possibly have them. There is absolutely no sense in bugging them as they have already stated they will contact us when they are running them and let us know how the production run is going. Business to business is a bit different than business to consumer. We have stated numerous times here that we are waiting on the forgings. Everybody knows that we are waiting on the forgings (The flashing 30 day lead time on the website). Everybody also knows that we will update the forum and the website as soon as we have concrete information to stand on. Until then, as I previously said. It is what it is. We are not going to change the website nor are we going to make an announcement until we for sure know when we are going to have the forgings in our hands. If that is not good enough for you, then I must apologize. I am not going to feed anybody a bunch of lies about what it is and what it is not. Until we have concrete information to stand on and make an announcement with the status stays the same in that we are waiting. We are at the mercy of others that is outside of our control. Hope this clears some things up.1 point
-
1 point
-
1 pointPower compression is a topic that is rarely discussed, but always important. When you hear someone call various theile/small parameters a “small signal parameter”, the implication is that with larger signals (more power), there will be a shift or change in these theile/small parameters. This is what we call power compression, and occurs in 3 potential ways. The first thing to consider is how theile/small parameters are derived. There are 5 basic parameters from which all other data is extracted. These parameters are Re, BL, Mms, Sd, and Cms. So looking at this from a mathematical standpoint, a change in any of these parameters will cause a change in all other parameters as well. Of those 5 parameters, there are three that can change once power (rather, more power) is applied; they are: Re, BL, and Cms. Now we will review the cause and effects for each one. Re is the measured DC resistance of the voice coil. When power is applied to the voice coil, the metal becomes hotter, and resistance increases. Heating copper by 200 degrees Celsius will double the resistance, which doubles the measured Re; this results in a 3dB loss in acoustical output. Being that this is also one of the 5 basic parameters, you will see a change in all other parameters as well. For example, a change in Re will cause a large change in your enclosure alignment because doubling Re will also double Qes, as demonstrated below: Qes = Re*Sqrt(Mms)/(BL^2*Sqrt(Cms)) This is power compression at it’s finest, and the most commonly mentioned one, known as Thermal Power Compression. The second type of power compression refers to motor force. As power is applied to the voice coil, causing it to progress out of the gap, the motor force (or BL) begins to decrease. This decrease in motor force causes a drop in output and, again, a shift in all other parameters. When the motor force drops by 30%, you've lost 3 dB in output. This is, in part, one of the reasons why more recent definitions (from DLC and Dumax as well as Klippel) of Xmax have defined it as 70% of rest BL. This type of compression is referred to as BL Power Compression. The third type is related to the compliance of the suspension. As power is applied, the voice coil begins to move out of the gap, causing the cone, spider, and surround to move as well. This movement changes the compliance of the suspension, and is known Cms Power Compression. Of the three, power compression is a more gradual process. A quick burst of power will heat the voice coil quickly but it will take a while to cool back down and remain fairly constant. Over a 30 second period, the coil will have cooled down and been reheated several times, so that while you thermal power compression occurs, it's not it does not occur nearly as fast as BL and Cms. In other words, thermal power compression is a much less dynamic issue. BL and Cms power compression are very frequent and occur on every stroke, as a stroke is simply the voice coil and attached assembly moving. For example, playing a 60hz sine wave will cause 60 full strokes in a one second period of time, and since BL and Cms compression occurs at both the positive and negative ends of the stroke, you would actually encounter BL and Cms power compression 120 times a second! Of course, as power is applied, excursion increases, and BL and Cms compression increases as well. This is why it’s so important to find a driver that has very flat BL and Cms curves (measured on Dumax or Klippel) because these curves represent the behaviour of BL and Cms over the stroke; if the curve is relatively flat and extends out fairly far on either side, BL and Cms compression will be of little effect until you reach the extremes. For most installs, BL and Cms compression will be of the greatest concern. For those who compete or have fairly high power stereos, thermal compression will become a growing concern as more and more power is applied. To summarize, Thermal, BL, and Cms Power Compression are all issues to consider, but it is important to understand how to work around these issues while knowing which drivers suffer more than others. A driver with adequate cooling and flat BL and Cms curves out to 20+ mm will likely experience very little parameter shift and, as such, is likely a better candidate for your high end stereo.1 point
-
1 pointHere is how to post almost any picture if already uploaded somewhere: You choose a picture you like. Right click on it. Copy image location. Repeat step 5 and 6 in the first post.1 point

.jpg.ea8ac89a2ec7f49de0b9e4027c74f515.thumb.jpg.dc61d2e06476e189721027d6a6eb6027.jpg)