Leaderboard
-
dem beats
SSA Regular40Points31,351Posts -
emh9009
SSA Regular8Points3,649Posts -
altoncustomtech
SSA Regular4Points3,836Posts -
95Honda
SSA Tech Team3Points2,232Posts


Popular Content
Showing content with the highest reputation on 07/09/2012 in all areas
-
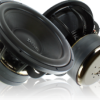
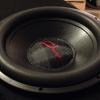
4 points4 points3 pointsWell Travis is getting a new amp.....that way no mistake can be made, no middle problems if something were to happen in a re-boarding process. It will be an A stock brand new amp, that has been on our bench for a few weeks running every speaker setup under the rainbow, currently a single tower running bridged at 2 ohms both channels. Using all HPF combos, and bandpass too,,,,,we replaced the amp with travis' 1100.4 JUST the same way. After about 3 hours of play time, its gotten fairly warm, as it definitely should be running at 1 ohm a channel, and its working as it should. So we've tried to find the problem, multiple times, the only thing we've seen could be a possible cause was a good sized dent on the heatsink as if it was dropped before. Other then that, hopefully the new 1100.4 recieved works as should, otherwise must be an install problem Thanks for the understanding.3 points3 points3 points3 points3 points2 points2 points2 points2 points2 points2 points2 points2 points2 points2 points2 points2 points2 points2 points2 pointsBecause I was in a rush and didn't really care about the final product I didn't take much time to make these look nice. I just wanted to test the waters of working with resin really. I only put about 2 layers on everything, but I'm fairly happy with them. If I took another day or so on them I think they would have been even better. Don't like the wavey edges, but those are on the bottom so you can't see them while sitting in the car anyways.2 points2 pointsThanx brother! I'm glad the ball is rolling on this thing again. I'm really looking forward to showing it off at some of the later shows this year. I think anyone that listens to it is going to completely flip when they find it's only a single 10. On that note, wire runs are completed and it's time to start building the amp rack. Here's the power wires coming out of their respective holes and grommets. The angle on that part of the sheet metal will make it much easier to get the wires and carpet to lay down as they should. Here's the wires coming up to the fuse holders. Yes, there's a bit of excess there, but that's only so I have the give/play for inserting the fuse. Both wires go down in between the fender well and AC lines and follow the frame back to the point where they come up through the sheet metal. These trucks really make that part much easier than I would have imagined. Here's the wires all tucked away under the carpet there. Worked out pretty good. Here's the wire bundle making it's way to the back. I went right up on the wall/rear fender well of the truck so it will all hide nicely under that part of the interior. Finally, I chose this mounting location for the remote gain knob for two reasons. One, it keeps it hidden so that strange fingers aren't tempted to play with it. Two, that little LED is brighter than hell and I couldn't find a good location anywhere else that it wouldn't be shining right up at me. It should work out pretty good there tho. AND MY PARTNER IN CRIME!!! My son Austin, who some may remember, recognize from the pictures of the build of the enclosure for the van. He's got a great deal of interest in all this stuff and the older he gets, the more he's interested and understanding everything I explain to him as we're doing this. I had him taking the dash apart to get to the wires on the HU to run the RCA's and remote power wire, had him helping me with the remote gain knob, and he helped run the power wires up to the engine compartment. He's a hell of helper to have!2 points1 pointI'm in the process of completely changing the crx's build so I decided to start a new build log. The old one can be found here: http://www.soundsolu...1-honda-crx-si/ The last thing I did in the build was add the new second amp rack with the LEDs under both amps (which I have yet to get a decent photo of, Sefugi). From there I was just so used to everything and was starting to compete in some comps and with a local in town. First thing that needed to be done was a new front stage, again. Pre ordered the Sundown Audio Neo Pro 6.5" mids with some infinity tweets. Found a great deal on an Alpine 9887 and grabbed that up quick. Before: After: Before: After:1 point1 point1 point1 pointI am really curious as to who likes this chick. Not my cup of tea at all....1 point1 point1 point1 point1 point1 point1 point1 pointsan marcos here!... we have a hand full of members in the centex area... and its good to see another!! im the SSA texas head, so if you have any questions or any local info dont hesitate1 point1 point1 point1 point1 point1 point1 point1 point1 point1 point1 point1 pointI am running 2 SA-12's of an SAX-1200D in a 2001 Ford Expedition. My back hatch and doors were rattling pretty bad. Got a hold of Don for 40 CLD tiles. From ordering to getting it to my house took about 5 days. I did the back hatch and two front doors, did 25% coverage and the difference is really noticable. Great product and easy guy to deal with. I will definitely buy from him again!!!! I used only 14 of the tiles and my truck sounds a lot better, I will do the other two doors next weekend.1 point1 point1 point1 point1 point1 point1 point1 pointI also made a $40 order to Fastenal. All hardware will be black oxide, including the washers. I ordered specific fasters for each application so it will look real nice when finished... I am heading to San Diego for work next week, will get more done when I get back...1 point1 point1 point1 point1 point1 pointCan I get All My fellow IAK Members to click on the Link below and Like it? Thanks Guys - Mike (Team IAK) http://www.facebook.com/#!/photo.php?fbid=256270531149875&set=a.256116361165292.51088.223379984438930&type=1&theater1 pointThe CTX's are a great set. I haven't heard the IA's so I can't comment on them.1 point1 pointAfter getting this all installed I lost a channel on the 100.4 so I'm only able to run 1 tweet with the other one broken anyways. Started having some real alt belt slip issues. The 3 ribbed belt wasn't cutting it at all. Did some research and found out that some new civics had 4 ribs on their belts. Found a D16y8 crankshaft pulley for sale and ordered that. As soon as that was put on my problems have gone out the window. I've had to tighten the alt once since then, but it was well worth the money to upgrade. Along with all of this i now have about 1/4" to 1/2" of play on my adjustment bracket, which I didn't have before somehow. Win-win.1 point1 pointThe tweeters that I got. Already blew one up from playing with xover points too low. Lessoned learned. Replaced the wire in the sub box as well. I wanted longer runs to be able to zip tie them to the bracing to prevent it all from dangling around in there. Got some home theater cable I found. Axiom. It's really nice, kinda' spendy, but then again it's OFC so I'm happy with it. I was one of the first people to order Gcons. Took a little over a month to get them, but the wait was well worth it! Fiday X 12s hanging out waiting for the Gcons to arrive1 point1 pointWas never happy with the "pods" that I made a year or so ago. Finally decided to make some real ones real quick just to see how hard it is to do. It's really not, just takes some time. Mats from local auto shop. Along with this stuff I just used some cut up speaker grill cloth as my "glass". Stretched nicely and was held a lot of resin. Starting a base layer Making the skeleton How it looking in the car (making sure it fit and was aimed correctly)1 point1 pointAfter that I changed all the speaker wire out, added a negative run from from battery to rear, added another 2 powerware batteries in the back for a total of 3 in the back and one similar sized XS in front. Welding cable 1/0 for negative and Knu OFC for +1 pointThe Dampeners. You can see where I found the larger ones... I needed to find some with a 10-24 or 10-32 thread... Jegs was the only place I found that I didn't have to order a shit-ton from... I will use 6 of them for the amp...1 point1 pointThanks man! AND You aren't kiddin', would love to see your rides and meet you and your family as well. I'm hoping to make it sometime soon. I know for a fact I'll be in Indy on Oct. 5th, maybe some sort of plans can be made for that trip? Thanx! I wouldn't have if I really had much of a choice and weren't being lazy. However, keeping them evenly spaced away from each other like I have them should pose no issues. Also, forgot one picture of the wire runs. Here's the last of the run as it comes out from the installed interior panel. Also, finally got my banner on the truck as well. Woohoo, SSA!!!!1 point1 pointSmall updates. FINALLY started to run wires for this thing and not easily in this tight spaced and cramped little truck. It's so difficult to get to certain things that I'm driving it around with the passenger side compartment/armrest removed and both back seats unbolted until everything is ran. I don't want to have to remove/install that stuff over and over. So far not much is ran due to the fact it's taken more time to figure out exactly where and how it's going to run than actually doing it. Drivers side speaker wire is the only one that's completely done. The RCA's, remote wire and passenger side speaker wires are starting to get in tho. I got the holes for the power wire entry into the cabin drilled yesterday and the fuse holders mounted as well. I got a couple of pics of the RCA's and passenger speaker wires getting bundled to be ran and the fuse holders to post up. Some progress is better than no progress and the more of some progress I can make the sooner it will be done!! Here's the passenger side of the truck as I mentioned before. Using the zip ties in this manner helps to keep things bundled and spaced. A cheap easy solution. I found an old license plate from my DRZ and bent it for this job. If I were doing this install for someone else I would have found a better looking solution. Personally I don't really care as long as it doesn't look like complete crap and functions well. That's it for now, hopefully things continue to work out as they have and I'll get a little done each day after work for awhile. Once the wires are ran I can begin on the amp rack, which should go fairly quickly.1 point1 pointInteresting info, this same topic was posted on ROE, Coleman shows up and while I was at the gym, some other moderator deleted the topic. Hum, definition of shady. Wow.1 point1 point1 point1 pointIt's a shame to see ANY 'sound deadener' product fail simply for the fact that someone spent the time, money, and effort to install and now clean up the mess. Whether it was installation error, bad batch, whatever, it's a shame. And I am amazed at some of the comments and things that people have said in regards to Kyle's pictures... it's amazing how heated these sound deadening threads get.1 point1 pointYou should post this in one of the AT sub forums and see what is said. I know I will not buy this after seeing the pictures. And not using a roller will not cause this!1 point1 pointyeah sad to see Jacob fuller promote a crappy product. Especially from a kid that trash talked sundown publicly. Jacob used to recommend Peel N Seal as an effective sound deadener. Just because he owns Sundown doesn't mean he knows or understands anything about sound deadener. The owner of AT has a history of dishonesty and demonstrated idiocy. Don't know why people are surprised when his product fails to perform any better than his character & behavior would indicate. I would never use nor recommend the product.1 point1 pointSo you removed perfectly good product just to test another one? I could see if it were drivers or amplifiers, but who wants to do deadening more than once anyways?1 point
Account
Search
Configure browser push notifications
Chrome (Android)
- Tap the lock icon next to the address bar.
- Tap Permissions → Notifications.
- Adjust your preference.
Chrome (Desktop)
- Click the padlock icon in the address bar.
- Select Site settings.
- Find Notifications and adjust your preference.
Safari (iOS 16.4+)
- Ensure the site is installed via Add to Home Screen.
- Open Settings App → Notifications.
- Find your app name and adjust your preference.
Safari (macOS)
- Go to Safari → Preferences.
- Click the Websites tab.
- Select Notifications in the sidebar.
- Find this website and adjust your preference.
Edge (Android)
- Tap the lock icon next to the address bar.
- Tap Permissions.
- Find Notifications and adjust your preference.
Edge (Desktop)
- Click the padlock icon in the address bar.
- Click Permissions for this site.
- Find Notifications and adjust your preference.
Firefox (Android)
- Go to Settings → Site permissions.
- Tap Notifications.
- Find this site in the list and adjust your preference.
Firefox (Desktop)
- Open Firefox Settings.
- Search for Notifications.
- Find this site in the list and adjust your preference.