Search the Community
Showing results for tags 'ford'.
Found 5 results
-
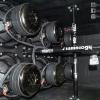
My old build log was deleted when DSS lost their section. So I have to start from scratch. Here is the update for my truck for the 2015 season. This build will be complete by October 2015 and will consist of the following hardware. 6 Team SSA 15" subwoofers 3 Taramps HD30kSPL amplifiers 3 JuiceBox LiFePo4 80ah batteries and 1 20ah. Single Reflex Bandpass Enclosure 10 cuft sealed, 35 cuft ported, 900cuin port area The end goal is to do a 165 any where. My last build loudest score was 162.3 outlaw with 6 15" DSS Ethos and 3 Taramps HD8000 This is still my only vehicle that I own.
-
Hey guys i think I'm in the right area of the forum to post this but if I'm not, my bad. I bought two Fi BL 15s fully loaded with the daily option a few months back. Originally I was going to buy a Sundown or Cresendo amp but money is tight so I've been looking into the Hifonics BE 2500.1. I know they have a bad name, but I currently own an older series Hifonics BXi 2008d and honestly love the amp. Don't get me wrong I've had it repaired about 4 times but all due to inefficient power supply. The new series is CEA compliant and Steve Meade proved they do put out the power advertised. With that being said, do you guys think a 240 amp Mechman Alt could power the 2500 rms amp? I don't plan on running the second battery just yet, but I'm also not trying to fully power it right now. And another question, what if the amp is rated at 14.4 ohms, should the Alt be the same or a little bit higher? Thanks for any input!
-
This topic is really for my new upcoming build which will be two Sundown Audio SA-12s on a Hifonics BRX 2400.1D sealed off from the trunk. The box is currently being built by Dave The Box Guy, it will have three different tunings with interchangeable ports (20Hz/28Hz/45Hz). For now, while I sit and wait, I am going to post my current set up just to show you all some of the work I have done so far. I don't have all the pictures since some things were done a little while ago such as, deadening, changing my door speakers, wiring etc. but I will eventually tear some things off and show you how I installed everything. Here it is.... Current build: Head unit: Kenwood KDC-X995 w/ iPad Mini Equalizer: Clarion EQS746 Mids/Highs: 4 Infinity Kappa 62.9I (wanted to keep stock look so they are in the stock location of the doors) Subwoofer: 1 15" Sundown Zv3 D2 3.3ft3 enclosure tuned to 33hz (Sub Up, Port to the side) Mids/Highs amp: Hifonics Zeus ZXi80.4 Subwoofer amp: Hifonics Brutus BRX 2400.1D Electrical: Stock 150A alternator, XS Power D6500, BIG 3 to come soon Deadener: Second Skin Damplifier ***The only thing that will change with the new build will be the sub stage which is listed in the first paragraph, everything will most likely stay the same... for now lol*** This isn't my actual car, but this is what it looks like completely stock on the outside.. Here are some pictures of my car after some cheap mods! Tint is %30 and hubcaps plasti-dipped! Tinting my tail lights soon! Don't have a pic before the de-badge so here is the after.. If you can tell I replaced the stock antenna with a "shorty" On to XS POWER, haven't done the BIG 3 yet but that is on the list of things to do.. Here is the stock battery under the hood. I already ran the 1/0 gauge wire through and plan on shortening the wire to the fuse soon as well. I will try and get pics of how I ran it later.. Look how small the stock battery is compared to the XS Power D6500!! Finally installed, it was a b**** to get into that small space.
-
Make sure you check out my build log and comment, the link for my log is in my sig! My wires are extremely messy because I am getting ready for my new build.. Anyways, click on the pic to see my vid and thanks for looking. EDIT: Found out how to post youtube videos now.. http://youtu.be/T7WcC0U24Sw
-
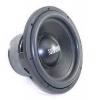
I just finished installing my SSA Carbon Fiber Convex Dust Cap and I am really impressed by the way it looks. I have not taking a listen yet, though I'm sure there won't be any audibel difference. Here are a few photos I have taken. Here is a overview of both caps side by side Here you can that the original cap is "taller". Not exactly sure how this will affect anything. In this picture, it is very hard to see, but I place the new cap over on top of the other, to show that the new cap's "flanged" is just a hair bit longer. In this photo, you can see some bubbles in the crease around the cap before the flange begins. In this photo, pretty hard to see, but really really close up, you can see these "scratches"? I'm not exactly sure where this is from lol. But you have to be really close to see. In this photo, you can see all of its sexyness In this photo, you can see one of the problems I ran into. When removing the original cap, whats left is the glue's residue? I'm not sure what to call it, but it leaves two O-type rings around the former. When trying to lay down the New cap, it would not sit flat or flush. So I was forced to chip away with a small flat head screw driver on the outer ring. The inner ring seems a bit more permanent. Here is the epoxy I just picket up from Lowe's. Seems to work really well. It got real stinky real fast. In this photo, you can see the outter ring chiped away. And here is it installed I got a bit messy This was my first time every doing this, but atleast its clear, so it doesn't look too too bad. Cosmetically though, this looks aMAZEing. Also, I will note that the cap I recieved, did not flush with the cone. It seems that the cone, and the flang are formed at two different angles. Not too too much difference, but enough to not look flush. So I had to use a little bit more glue, and push down as much as I could to try and make sure there is no gaps in between the connection of the cap and the cone. The original cone does seem a bit more "solid" for the lack of term. Like, the original cap is a hard plastic, you could knock on the back of the cap, and it would make a decent "thund". But the new cap, like, I could push it in? If that makes sense. I've never personally handled Carbon Fiber, so I don't know what to expect. Maybe bend but never break kind of thing? lol. It is extremely light though! So overall, I am pleased with this product and would definately purchase more in the future. Thank you very much SSA and Duran for allowing to me purchase another amazing top notch quality item