Leaderboard


Popular Content
Showing content with the highest reputation on 09/21/2010 in all areas
-
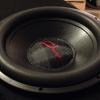
1 pointOk people....me and buddy decided to deaden my roof today! With great results i must say! We started with a single layer basically all the way across and then doubled up in area's we thought might be trouble spots. The product feels good and is easy to work with.We didn't even have to use a roller through most of the install. This is some VERY sticky stuff! lol The only thickness i had to compare the Audiowrap to was some Second Skin Damplifier Pro.This stuff was not as thick...yet i didn't expect it to be. Damp Pro is the upper model of SS and i have never had any orginal to compare with.Though i was told Audiowrap did have some 10mil thick line coming out ! Anyway we got the roof done and it was a night and day difference! Even halfway through the resonance of the front uncovered panels was already being affected by the covered mass. The stuff does work! I got a few pics...but the meat of this review is in the video....where there was a before and after test done.(I'm working on the vid now) But i can tell you that i can tell a major difference just through the music and frequency response of my vehicle! I can actually enjoy my lows without the constant thud of my roof ruining my listening experience! I'm sure the resonance frequency of my car is lower now and i am thankful! All in all i must say this is a great product from a new company and i can only see things getting better! Well...that's all i got ..lol...The video will do ALL the talking for the product from here!
-
1 pointNice, here is a little "review" i did of mine... waiting on your video!
-
1 pointHuge thanks to JBLCAMRY here on the board for helping us out with sketchup and making the drawings for us. If they don't fit your vehicle..sorry. These are simply general boxes for the average install for a musical daily driving scenario. If you are looking to chase numbers you are on your own. http://www.soundsolutionsaudio.com/forum/forum/68-fi-technical/ Check it out! More to come later
-
1 pointBTL series enclosures and cut sheets! BTL 12 2.45 cubic feet @ 32Hz BTL 15 4.00 cubic feet @ 32Hz BTL 18 7.00 cubic feet @ 32Hz
-
1 point
-
1 point
-
1 pointLots of progress today. BangingGMC and his boy Jason came over and helped out big time.... on to the pics....
-
1 pointDon I agree that having two competing brands on one forum can be complicated, but remember we have 10 competing subwoofer brands, 5 competing amplifier brands, and 5 enclosure brands. a little competition is healthy
-
1 pointThe number of responses you've received is a direct result of the quality of the question asked and information provided. For starters, please read the Noob Posting Guidelines With the lack of information you provided, anything we say will simply be a shot in the dark. I don't know if I need to suggest a $100 5.25" 2-way component set or the $7000 Rainbow Platinum 3-way component set. We don't know what size speakers you are looking for, your budget, your goals for these speakers and setup as far as output and sound quality, which speakers you plan to replace (both front and rear or just front?), how you will be powering the speakers, if you are powering them from an external amplifier what amplifier and how much power you would be using, how you plan to install the speakers (stock location w/ no modifications, stock locations w/ modifications possible, kickpanels, etc), what music you plan on listening to, what your sound preferences are, how much experience you have w/ past products and what you like/didn't like about them, etc. It's sort of like I Robot.....In order to receive a response, you must first ask the right question.
-
1 pointjust so you know, adhesion has asolutely no direct benefit to sound deadening. so long as the product sticks to where it's been applied, more adhesive doesn't help you sound deaden your vehicle AX I said that about the adhesion because when I stick something somewhere I like it to stay. That's certainly a requirement, but it's a very low standard to meet. You are right to point out that it can't always be assumed to be the case for products sold for this purpose. Once we pass that minimum threshold, the formulation of the adhesive becomes critical. "Butyl" covers a very wide range of materials Just being butyl based does not mean the adhesive was designed for vibration damping. The performance difference between an adhesive designed for vibration damping and those designed for other purposes is huge. Most butyl compounds intended for construction perform no better than asphalt, except that they will stick and are unlikely to fail when exposed to heat. I don't know anything about the adhesive used in this product except what I've seen in their previous products, so I'm not assuming anything. Just that "sticking" tells us nothing and should be expected.
-
1 pointAlright, everything is going well here. The hospital has discharged the wife and she's now home. Hopefully not going back ANY time soon, we HATE hospitals. ANYWAY............ Here's the pics as promised guys. Unfortunately battling with insomnia two nights along with concentrating on the work led to the absence of thought on taking pictures during the installation of everything. I'll post what I have though. If you notice, there's a lack of wires for the fuse holder. I removed the bolts that were in it and used all-thread to make the connections on the back side of the board to help clean up the look. There's a few more things to do such as test and tune, a few more fitment issues with the amp rack to resolve and other little odds and ends but it's working out pretty good overall.
-
1 pointThanks, that's what I'm going for. Amp rack should be installed REAL soon. Thanks man. Felix appreciates the comment as well. Thanks! and yeah Iove those terminals too. They make it so easy and clean to make quick connections/disconnections. Soldering larger guage wire onto those terminals takes a bit of patience and experience, that's quite true. Patience more than anything though. On to a few quick updates, got the amps mounted to the board. As soon as the last of the wiring is completed in the van this should start going together. Hopefully I'll be testing and tuning by the middle of the week. Mmm, mmm, them amps look sexy.
-
1 pointHere's a few updates. First of all, a little messing around. What's that old saying?? Oh yeah, curiosity deafens the cat? Wiring and installing the first sub. Some pictures of the soldering of the Neutrik Speak-on terminals. Wiring and installation of the second sub. And everything to do with the subs and the box are DONE! I think the look of the subs and the enclosure turned out almost exactly as I had hoped. The motors on them Q's are just SEXY!
-
1 pointGot some more work done, next to wire the box and put the subs in it. Got the subs out last night and put the SERIES wire in place between the coils. You might be able to see it in the picture down by the magnet. It's both leads of 12AWG Knukonceptz Karma speaker wire. Applying the carpet to the beauty panel on the amp rack board. Here's the carpet finished. Amps will be mounted to the board tonight along with the wiring and installation of the subs in the enclosure. If all goes well getting the rest of the tiny details complete it will be done this weekend.
-
1 pointNow thats SEXY!!!!! Your creativity on design is exceptional!!!!! I can't wait to see how the rest of the van comes together. Way to show others how you made a template scribe to transfer to the wood.
-
1 pointHere's a few little updates. Here I'm cleaning up the holes drilled into the board for all the wires. Dremmel FTW! Here's a shot of the channels routed into the back of the board. In this area the board will be right up against the panel in the van. To keep things flush the wires will run down the channel to the SAX-100.4 and be held in place by an 1/8" piece of fiber plate. (an old sign from work, thin but very strong) You can also see the beauty panel that will trim and fit the amp board to the panel in the van. Ready for carpet. Carpet applied to the front only for now until the adhesive sets, then I'll slowly work it around the edges.