Leaderboard


Popular Content
Showing content with the highest reputation on 09/16/2010 in all areas
-
1 pointI stumbled upon this website while looking for new lifts, and was encouraged to make a topic about it. It gives a description of each muscle group as well as exercises to isolate them. Seemed pretty helpful to me. Exercise and Muscle Directory
-
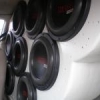
1 pointHu guys, This is my third box for my sub. It's the loudest one! Now, I feel That I have a really powerful system !!! The design is coming from Bromo. I bought the2 4" ports at Madisound : it was a pleasure to deal with them. Fast (very fast) answers, they shipped my order the next day, and they gave me the choice for the shipper. Loved it ! first box was a L ported box : 3.5 ft3 at 32 hz with sub and port up. It was taking ALL my cargo space and was not really powerful. I can't understand why; it was sooo loud in another smaller car with the same sub. second box was 3 ft3 sealed, firing up or back : I lke it, seems louder than the first one ! More cargo space left, This box NOW : The sub : Working on the bracing : The HUGE ports in : Carpeting in action : DONE : Another look inside : Screwing the ports to the box : Terminals :
-
1 pointSo here are the details 2 18" Xcons in a wall (Maybe? depending going to be a possibility Bravox CF60s for components (maybe two sets?) 1-2 Xs D3100's and a smaller Xs batter for upfront Amps undecided, Maybe sundown, possibly some other things Deadener from Sound Deadener Showdown Double din headuint, still undecided Wire and Install stuff from Knukonceptz or Subtilis Audio More to come... This is my baby that it's going into! This is going to be a slow build things will be coming in boxes and going in slowly. My 260 A alternator from DC Power Engineering Inc Need to get a case swap on this baby and it's going in! Stuff so far I've gotten in the mail What could this box be? Thanks Duran for the Birthday Present For size comparison That's .203 POUNDS per SHEET! More to come!
-
1 point10. March 2010 What's already done: Wires are pulled through the car ( 2 x 0 gauge cables, and 3 pairs of RCA's, all from Kicker) The car is partially deadened with Dynamat Extreme Infinity Kappa Perfect 6.1 is installed in the front. (The passive Xover was moved into the car a couple days later) What's bought: Clarion DXZ788RUSB CD player Soundstream REF4.920 (4x145W rms @ 4 ohm) Hifonics XX Colossus II (3200W rms @ 2 ohm) Two Fi Q 18" D2 (1000W rms) 180A Iraggi alternator with lifetime warranty Two Stinger Voltage meters, one to measure the Voltage at the front battery and the other to measure to battery bank at the back Hushmat deadening, to be used in the trunck and roof. Kicker Speaker wires Kicker 50mm2 power wires Tsunami 180A Circuit Breakers Tsunami Battery terminals Stinger Battery isolator Bag with Stinger 50mm2 ring terminals Various Stinger wire adapters, 50mm2 --> 21mm2 og 21mm2 --> 8mm2 Ctek XS 25000, 25A smart battery charger The Fi Q Subwoofers: The insides of the Colossus II: Subwoofers that love big boxes: What's left to buy: NSB 75 and two NSB 125 batteries. The a explaination on how you get two 18" in a vented enclosure in a small Celica... Well, I'm going to take out the rear seats and the enclosure is going to build so that the subs will be firing towards the front right behind the rear seats. The port will also be firing in the same direction, so that I get a nice breeze on warm summer days. The enclosure will be about 450-550liters which is about 16-20cu.ft. There will be a plexi glass plate between the enclosure and the roof so that I will not be obstructing the view through the back window. The amplifiers will be placed on top of the enclosure. I'll also make two fiberglass covers that will go on the front baffle and the roof of the enclosure, they will hide cables and cover any small openings on the sides between the enclosure and the car, those will be covered in grey/black vinyl to match the interior of the car. Clarion cd player will be running the fronts actively with the Soundstream amp. And the Ctek charger will be installed in the car, but it will be easy accessible so that I can take it out of the car if I need to charge something else. That's the plan, now we're waiting on the weather gods to turn up the heat. 13. April 2010 Then the work starts: Deadened the trunk today, beautiful weather today, +13C and no clouds. The CD player I'm using now, a real beauty: The 1" MDF plates that's bought: The workshop and all the tools at school that I'll be using: got to have some music while you work: The trunk before: All the cables waiting patiently to be used: The room at my disposal: My baby: Got to eat to, dinner for my sister and me: The result: Lot's of deadening got used: The car stereo waiting to be used: 18. April 2010: Deadened the roof today: 19. April 2010: Made a cardboard model of the enclosure, using a Kinetik HC1800 as a dummy battery:
-
1 pointThese thing are way bigger then i expected
-
1 pointIMO the L7 is a good all around driver. They can get very loud in a properly designed and constructed enclosure, but are also capable of maintaining adequate sound quality. You already have it, and going that route is the cheapest option. Might as well stick with it. The Dcon is a great budget oriented driver, but I really don't think it can do anything that the L7 can't. You won't be missing out on anything by going with the L7 over the Dcon. Unless you just feel like trying something new......in which case, the Dcon is a good choice for a ported enclosure.
-
1 pointFinal result : Amps behind the box : for my sub for my speakers
-
1 pointSo if it has a 1" hole in the middle you need to leave 1/2" behind the sub for clearance.
-
1 pointMake sure you check out HAF and post this build there also.
-
1 pointPut the Triple Baffle on, sanded the inside of the box, outside, and round bit over the edges. My ports should be here Monday hopefully, and i'll finish up the box after they get in.
-
1 pointPRs work great, but I just don't think they belong in a car. There isn't any suspension to them besides the spiders and surround, and on top of that, the mass of those is so great that their weight carries the way the car shifts. If you are hitting bumps, the weight of the moving mass is going to transfer and move unlinear and stretch the suspension in ways it is not supposed to. And those same things that could go on with PRs in a car will cause odd distortion when the cone moved like that. I hate to break it to ya, but I think you'd be best sacrificing or making space for a ported box. Just my $0.02
-
1 pointWell all amps have heatsinks... This is an explanation of it... The purpose of changing a heatsink in the manner that they did was to create more surface area... This basically exposes more of the amp "heatsink" to the air to allow it to cool better....
-
1 pointThis is for a single SSD right? It does not need 1500watts, and it is not really designed for that. I personally would lean towards a higher quality amplifier that is with in budget, that puts out power closer to the ratted specs (not near double, and yes music dynamic and the SSD would rarely see the full 1500ish watts). But that is just me.
-
1 pointAudio que 1200d
-
1 pointBought a new cd player, a Pioneer RS-D7RII, DEQ-P90 and RS-P50. I'll be using the DEQ-P90.
-
1 pointStarted to make the sides: Loaded all the sides and some rests, and the coilovers: I placed all the sides to take a look at what I'm actually building: The place beneath the enclosure (the boxes are models of my batteries): Bought some new tools: And I started up a router for the first time: The hole was round at least: ^^ Not perfect, this is the start and end, the rest was nice and round: I used a file to make the start/end nice and round. With some fabric it will not be noticeable: Looks kinda massive in the car... Looks good with the sub in it's place: Got the windows tinted: New license plate: The carpark at home:
-
1 pointThanks guys. I have taken a long break from the build because of the exams. But tomorrow I'll continue with the build. Have a update for you all though: 22.05.10 I started to fill the gap between the fiberglass mold and my floor with some fiberglass. I used a method I learned from a forum buddy until I didn't have anymore resin for fiberglass. (Let the fiberglass soak in the resin before you put it on, much more messy but a lot easier to mold the fiberglass into place.) So I looked around at the schools workshop, and I found a big 20liters can with resin. The title said resin, and from my watching of hot rods on discovery channel I knew resin was something we call polyester which is used for fiberglass. So I smelled it, looked at the color and it looked good. So I mixed it up with my hardener and started working with. Feeling pretty good since I would be done tonight. Paint workshop at my school: Resin I thought was Polyester: The day after I was pretty busy with my colorful words that would have made a old fisherman blush. So I didn't take any pictures. Resin is a apparently a English word used for many different types of sh***, this turned out to be Epoxy... So it didn't dry pretty good. So I started taking of the fiberglass soaked in epoxy and then I rubbed the surface with acetone, to clean away the epoxy while many colorful words on English, Bosnian and Norwegian bounced off the walls. They say burned children learns best, and this kid here has learned his lesson. Never EVER use something you're not 110% sure what is. I have never had to clean something that's so hard to get rid off. But after that wonderful experience, I went to Biltema (cheap place to get your hardware, something like Home Depot) to buy some correct Resin and I finished the sides: After it was cured I went to the Concrete test lab to see if it's airtight: Hmm, apparently it isn't... The mold I got from a friend let water out like a bloody sieve. So I let it dry and then I laid two layers of fiberglass and a lot of resin to seal the bottom. That did the trick and now it's airtight like a can of beans. Some pictures of how it looks inn the car: And here will a Carputer be placed to the autumn: Then some pictures of the Monster that will power my babies: Shopping trip for a barbecue party, all the essentials... The biggest contender on the party: About a week ago I bought my batteries. I went for Stinger batteries, got them for the same price as Odyssey, so why not. I bought one SPP1200 and two SP2150 and I connected them to my Ctek XS25000 battery charger and have had them on maintenance charging for about a week now. A picture of them when I first got them:
-
1 pointIt's going to moan my name in the dark... Update: 03 March 2010 The front baffle drawed in scale: New CD player: Annen farge: 11 March 2010 Disassembling the suspension: 12.05.10 The only sticker that will be on the car: 13 March 2010 I started with the first walls today, it's actually starting to look like a enclosure! Carpenter skills : 14 March 2010 Sandblasting:
-
1 pointthanks for the comments. Some more pictures for you all:
-
1 point21. April 2010: Started making the floors (got to love to have professional tools at your disposable for free ): 23. April 2010: Motorshow at Fredrikstad started today. Here I met a very nice man that used to own the same car as I do, and through some talking he mentioned that I can have a fiberglass enclosure for free, since it's only taking up space in his garage. He had two Focal 13" subwoofer in it, I'll remove the front baffle and use the fiberglass mold in the bottom so that I can utilize the space from the wheel well: The polish job I did on the show: The stand vi had on the show (We won the best stand award ):
-
0 pointsBump
-
0 pointsYeah, I can't pm him on here


.jpg.ea8ac89a2ec7f49de0b9e4027c74f515.thumb.jpg.dc61d2e06476e189721027d6a6eb6027.jpg)


